Balance and mount decide most of it. A spring loaded arm works for light to medium mics, while a scissor style holds heavier setups more firmly. Check the clamp thickness range and the included counterweight before buying, not the brand name. For podcast beginners and streaming, a mid range arm with a desk clamp is usually the right call.
Mount First, Everything Else Second
A boom arm is only as good as its anchor. Desk clamp arms are the most common and work on edges up to roughly 2 to 3 inches thick, but check the listing because some clamps are thinner.
Wall mounted arms free up desk space and stay put, but you lose the ability to swing the mic to another seat. A floor stand with a boom is the right alternative if your desk has a glass top or a thick beveled edge.
The clamp pad material matters for furniture. Hard plastic pads can dent a soft wood desk, while rubber or cork pads grip without marking. Look for a clamp that specifies the maximum thickness and the pad material.
How Much Reach You Actually Need
Measure from the mount point to your mouth, not to the edge of the desk. A 30 to 40 inch horizontal reach covers most seated podcast and streaming positions, but a standing vocal take needs more height.
Vertical rise is the part buyers forget. A short vertical post forces the arm to stretch horizontally, which pushes the mic toward your face and blocks your screen. Check the vertical tube height and the total arm length as two separate numbers.
For guitar recording, you need enough reach to place the mic near the sound hole without the arm crossing your picking hand. A longer horizontal section helps, but it also increases the leverage on the clamp, so the base must be rated for the load.
Joint Tension and the Drift Problem
The main mechanical difference between cheap and serious arms is the joint friction. A spring loaded arm uses tension to hold position, which works for small dynamic mics but sags under a heavy condenser.
Scissor style arms have locking knobs at each pivot. They hold a large diaphragm mic still, but repositioning takes two hands and often makes a creak. If you move the mic between takes, a spring arm is less annoying.
Check whether the arm has adjustable tension. Some arms let you tighten the springs or screws as the mic weight changes. A fixed tension arm is fine for one mic, but it becomes a problem when you upgrade to a heavier model.
| Design | Hold strength | Repositioning | Best for | Watch out |
|---|---|---|---|---|
| Spring arm | Light to medium | One hand, quick | Podcast beginners, streaming | Drifts with heavy condensers |
| Scissor arm | Heavy | Two hands, slower | Home vocals, large mics | Bulky, can creak |
| Wall mounted | Very heavy | Fixed, no swing | Dedicated desk setup | Holes in wall, no portability |
| Clamp on | Medium | One hand, moderate | Bedroom producers, small desks | Depends on desk edge |
A clamp on arm with a spring is the middle ground. It moves easily but still holds a typical podcast dynamic mic. If your mic weighs more than about 2 pounds, lean toward a scissor or wall mounted design.
Cable Routing and Studio Tidiness
A dangling XLR cable pulls on the mic and adds weight to the arm. Built in cable channels or clips keep the cable along the arm, which reduces sag and prevents the cable from catching on your chair.
Some arms have a full internal channel, while others use external clips. Internal routing looks cleaner but is harder to thread if you swap cables often. External clips are easier but can pinch the cable if they are too tight.
For streaming, a tidy cable run also matters on camera. A loose loop behind the mic reads as clutter. Check the listing photos for how the cable is meant to travel from the mic to the base.
The Mistakes That End in a Return
Buying for the mic you want, not the mic you own. A heavy broadcast mic needs a stronger arm than a USB podcast mic. If you plan to upgrade, buy the arm for the heavier weight now.
Ignoring the desk edge shape. A rounded or beveled edge gives the clamp less flat surface to grip, so it can slide. A square edge holds best. An angled desk edge may need a shim or a different mount.
Mounting the arm behind the keyboard instead of to the side. A side mount keeps the arm out of your typing path and lets it swing in from the left or right, which feels more natural on camera.
Over tightening the joints to stop drift. That wears the washers and makes the arm sticky. If you need to crank every knob, the arm is under rated for your mic.
Long Term Costs and Upkeep
Boom arms have no consumables, but the clamp pads and joint washers wear over time. A rubber pad can harden and lose grip, and a worn washer makes the arm creak. These parts are cheap to replace on arms that use standard sizes.
The biggest long term cost is usually the upgrade path. A budget arm that works for a USB mic may not hold a broadcast condenser, so you end up buying twice. Spending a little more on a higher weight rating avoids that.
Dust and skin oil collect on the metal tubes and joints. Wiping the arm with a dry cloth every few weeks keeps the finish clean. Avoid oiling the joints, which attracts dust and makes the friction worse.
When a Boom Arm Is the Wrong Tool
A floor stand with a boom is better if you record standing vocals and move between rooms. A desk arm limits you to the desk area, and a wall arm limits you to one spot.
A low profile desk stand works for a small USB mic on a clean desk where you sit close. It takes less space than an arm and costs less, but it picks up desk vibrations and is harder to position at mouth height.
For guitar recording in a small room, a short floor boom lets you place the mic near the amp or the guitar without a desk. A desk arm can reach, but the long horizontal section may vibrate when you play loudly.
If your desk is glass, a clamp can crack it. A floor stand or a wall mount is safer. If your desk has a lip that is too thick for any clamp, a wall mount or a grommet mount may be the only option.
Reading the Listing Before You Buy
Check the stated maximum mic weight and compare it to your mic plus any shock mount. If the listing does not give a weight, ask the seller. A generic 'fits most mics' claim is not enough.
Look for the clamp thickness range in the listing, not just the arm length. A 2 inch clamp will not fit a 3 inch desk. Some arms offer a larger clamp as an add on, but you should confirm before ordering.
Ask about the thread size at the mic end. Most arms use a 5/8 inch thread, but some budget arms use a smaller size that needs an adapter. An adapter adds height and wobble, so it is better to get the right thread from the start.
Check whether the counterweight is included. Some arms need an extra weight for heavy mics, and it may be sold separately. Without it, the arm will sag even if the weight rating looks fine.
Boom Arm Questions Before You Mount One
Is a microphone boom arm worth it for a beginner podcast?
Yes, if you record at a desk. A boom arm keeps the mic at a consistent distance from your mouth, which evens out your volume and reduces plosives. It also frees desk space and keeps the mic off the surface, which cuts rumble and keyboard noise. A budget arm is fine for a small USB mic, but check the clamp fit before buying.
Which microphone boom arm holds a heavy condenser mic?
Look for a scissor style arm with a stated weight capacity above your mic plus shock mount, often 2 to 4 pounds total. Wall mounted scissor arms hold the most because the base is fixed. A spring arm may claim the same capacity but will sag at full extension, so compare the joint design as well as the number.
How do I choose a boom arm for streaming?
Prioritize a side mounted clamp, a horizontal reach long enough to come from off camera, and a cable channel to keep the run tidy. A spring arm is easier to move out of the way when you stand up. Make sure the clamp fits your desk thickness and that the arm does not block your monitor at its resting position.
Should I buy a wall mounted or desk clamp boom arm?
A desk clamp is the default unless your desk cannot take a clamp. Wall mounting saves desk space and is the most stable, but it puts holes in the wall and fixes the mic to one spot. Choose a wall mount for a permanent studio desk, and a clamp for a setup you may move or adjust.
What makes a boom arm drift or sag?
Drift comes from joints that cannot hold the mic weight, weak springs, or a missing counterweight. Sag at the far end is worse with long horizontal reaches and heavy mics. An arm rated for more weight than your mic, with adjustable tension, will hold position better than a fixed tension arm at its limit.
Which Boom Arm Setup Fits Your Desk
A podcaster at a standard desk with a USB or dynamic mic should get a spring loaded clamp on arm with a 30 to 40 inch reach and a cable channel. It moves fast and holds a light mic steady. A home vocalist using a heavy condenser should instead get a scissor style arm with a higher weight rating, even if it costs more and adjusts slower.
Real microphone boom arm listings, so you can check the points in this guide against actual products. These are affiliate links: as an Amazon Associate we earn from qualifying purchases, at no extra cost to you.
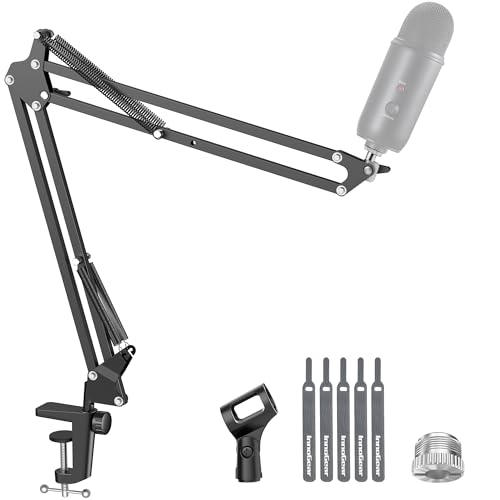 INNOGEAR InnoGear Boom Arm Microphone Mic Stand for Blue Yeti Fifine…
View on Amazon ↗
 FIFINE FIFINE BM88 Low Profile Microphone Boom Arm Stand for Gaming…
View on Amazon ↗
 SUNMON Metal Desk Clamp For Microphone Suspension Boom Scissor Arm Stand…
View on Amazon ↗
Listing names and images come from Amazon and are rechecked against the live listings; last checked Nov 8, 2026. No prices shown; the current price is on the listing.
What this guide is. This guide covers microphone boom arms as a category, not specific models or brands. It is written from general knowledge of how these arms work, without individual product documents, reviews or tests, so check any dimension or weight limit on the listing before you buy.