Start with two factors: your water source pressure and your plant layout. Low pressure suits gravity fed barrels, while municipal supply usually needs a pressure regulator. Then match emitter type to plant spacing: drip tape for tight rows, individual emitters for scattered pots. The main tradeoff is even watering versus setup effort.
Know Your Water Pressure Before You Pick a Kit
Most drip kits are built for a narrow pressure band, often 15 to 30 psi. Household water pressure typically runs 40 to 80 psi, which can blow fittings apart or make emitters spray instead of drip. A pressure regulator drops the line pressure to what the kit expects.
Gravity fed systems from a rain barrel or elevated tank produce only 2 to 10 psi. That is too low for pressure compensating emitters, which need a minimum pressure to open. For gravity setups, look for noncompensating drippers or drip tape rated for low flow.
Check the listing for a stated pressure range. If the kit does not mention one, assume it needs a regulator on municipal water. A regulator is a small add on but changes the cost and the fittings you need.
Match the Emitter Style to How Your Plants Are Arranged
Drip tape is a flat tube with prepunched holes every 6 to 12 inches. It suits straight rows of vegetables or dense flower beds. The tape lies flat, waters the whole row, and is cheap to replace. But it kinks easily and is not ideal for curves or slopes.
Inline emitter tubing has small drippers built into the tube at fixed spacing, often 6, 12, or 18 inches. It is sturdier than tape and handles gentle bends. Use it for long runs of shrubs or perennials where plants sit at regular intervals.
Punch in emitters, sometimes called button drippers, let you place water exactly where a plant sits. You push a barbed dripper into a hole you poke in the mainline. This works for pots, hanging baskets, and mixed beds with irregular spacing. It takes more assembly time but wastes less water on empty soil.
Soaker hose is a porous tube that sweats water along its whole length. It is the easiest to lay out but the least precise. On a slope, water pools at the low end. In sandy soil, it wets a narrow strip. For most vegetable gardens, drip tape or inline emitters outperform soaker hose.
| Emitter style | Best layout | Evenness | Setup effort |
|---|---|---|---|
| Drip tape | Straight rows | High | Moderate |
| Inline emitters | Regular spacing | High | Low |
| Punch in emitters | Scattered pots | Variable | High |
| Soaker hose | Gentle beds | Low | Very low |
A kit may include a mix of these parts. For a balcony or small backyard, punch in emitters plus a short mainline often beat a row focused tape kit.
If you grow vegetables in raised beds, inline emitter tubing with 6 inch spacing is a common sweet spot. It is predictable and quick to install.
Balcony and Container Setups Need Different Parts
A balcony garden rarely has a hose spigot. Many balcony kits run from a bucket or a small pump. Check whether the kit includes a battery timer or a manual valve, because watering by hand defeats the purpose.
Containers dry out faster than ground soil. Look for a kit with adjustable drippers, often 0.5 to 2 gallons per hour, so you can give a thirsty tomato more than a succulent. Stakes that hold the emitter above the soil stop it from clogging in wet dirt.
Weight matters on a balcony. A full 5 gallon reservoir plus tubing can exceed what a railing planter can hold. Keep the reservoir on the floor and run 1/4 inch tubing up to the pots.
Drip irrigation kits suit balcony gardens with at least six to eight pots. For two or three small pots, a watering spike or a simple bottle dripper is less work than a full kit.
Dry Climates Make Watering Evenness NonNegotiable
In arid regions, inconsistent watering shows up fast as blossom end rot on tomatoes or leaf curl on peppers. Pressure compensating emitters deliver the same flow even when the line pressure shifts, which matters if your municipal pressure drops in the evening.
Evaporation losses are lower with drip than with sprinklers, but only if the emitters sit near the root zone. In dry heat, a 1 gallon per hour dripper on sandy soil may wet only a six inch circle. You may need two emitters per plant or a higher flow rate.
Mulch is part of the system. A drip line under two inches of mulch loses far less water to evaporation. Kits that include stakes for lifting emitters above the mulch can help you see whether they are running, but they also expose water to the air.
If you leave for a weekend in a dry climate, a timer is not optional. Choose a kit with a hose end timer or buy a separate one that runs on batteries and works with your faucet.
Beginner Mistakes That Turn a Drip Kit Into a Leaky Mess
The most common mistake is skipping the pressure regulator. Municipal pressure will pop microtubing off barbs or split cheap tape. If the kit does not include a regulator, buy one rated for the kit's pressure range.
Another mistake is using too many emitters on one line. A 1/2 inch mainline can supply only so many gallons per hour before the far end starves. Check the kit's maximum flow rate and add up your emitters. If you exceed it, split the system into zones.
Do not bury the tubing. Drip lines sit on the surface under mulch. Burying them invites roots to grow into the emitters and clog them.
Flush the lines before you cap the ends. Open the end cap, run water for a minute, then close it. Debris from installation is the main cause of clogged emitters in the first month.
For beginner gardeners, a kit with color coded parts and a simple diagram saves more time than a cheaper bag of loose fittings. Look for a kit that includes a flush cap and a goof plug for mistakes.
Read the Listing for These Four Things
First, check the tubing diameter. Most small kits use 1/4 inch microtubing, which is fine for a few pots but cannot run more than about 30 feet total. Larger gardens need 1/2 inch mainline with 1/4 inch branches.
Second, see whether the kit includes a filter. A screen or disc filter catches sand and rust that clog emitters. If your water has sediment, a kit without a filter is a bad buy.
Third, ask the seller what the emitters' flow rate is. This is usually 0.5, 1, or 2 gallons per hour. You need to know this to calculate how long to run the system. If the listing does not state it, the kit is probably unbranded and the emitters may vary.
Fourth, confirm the fitting type. Barbed fittings push into tubing and hold with friction, while compression fittings need a locking collar. Compression fittings hold better on higher pressure but are harder to take apart. Barbed fittings are fine for most low pressure kits.
Long Term Costs: Filters, Fittings, and Frozen Lines
The kit is not the last thing you buy. Emitters clog over time, especially with hard water. A spare pack of emitters is cheap and saves a dead plant. Filters need rinsing every few weeks in dusty conditions.
Fittings wear out. The little barbs that hold 1/4 inch tubing can crack after a season or two in sun. Keep a few spare tees and elbows on hand.
In freezing climates, you must blow out the lines with compressed air or drain them completely before winter. Water trapped in fittings freezes and splits them. Kits with quick connect fittings are easier to drain.
Tubing degrades in UV light. Black polyethylene lasts several seasons but becomes brittle. If your kit runs across a sunny patio, cover it with mulch or expect to replace sections every few years.
A hose end timer is a recurring cost if it runs on batteries. Budget for two to four AA batteries per season, or choose a solar timer if your faucet gets sun.
Who Should Skip a Drip Irrigation Kit
If you have a single large tree or a few big shrubs, a soaker hose or a simple bubbler on a hose is less work than a full drip system. Drip kits shine when you have many small plants or rows.
If your garden is a lawn, drip is the wrong tool. Lawns need sprinklers or spray heads. Drip lines cannot throw water over a wide area.
If you travel for weeks at a time and have no one to check the system, a drip kit plus a timer can still fail if a fitting pops off. A simple irrigation controller with a soil moisture sensor may be more reliable, but it costs more. For a small balcony, a self watering planter can be a simpler alternative.
Renters who cannot drill or run a hose from a spigot may find a gravity fed bucket system too limiting. A watering can with a long spout is sometimes the honest answer.
The Three Decisions That Change the Result Most
Water pressure comes first because it determines whether the kit works at all. A kit that needs 25 psi will fail on a rain barrel, and a kit rated for gravity will blow apart on a hose spigot without a regulator.
Plant layout comes second. A straight row of carrots needs drip tape, while a balcony of mixed pots needs punch in emitters. Buying the wrong style means redoing the whole system.
Emitter flow rate comes third. A 2 gallon per hour dripper on a small herb pot will flood it, while a 0.5 gallon dripper on a tomato in July will leave it thirsty. Match the flow rate to the plant size and soil type.
Everything else, like tubing color or the number of stakes in the box, matters less than these three. A cheap kit with the right pressure and emitter style will beat an expensive kit with the wrong ones.
Drip Kit Questions Before You Buy
Is drip irrigation worth it for a small balcony garden?
For a balcony with at least six to eight pots, yes. A drip kit saves daily watering time and gives each pot a consistent amount. For two or three pots, a watering spike or a bottle dripper is less setup and cost. Balcony kits often run from a bucket or a small pump, so check that your kit includes or works with a timer.
Which drip irrigation kit is best for vegetable rows?
For straight rows of vegetables, drip tape or inline emitter tubing with 6- to 12 inch spacing works best. Drip tape is cheaper and waters the whole row evenly, but it kinks more easily. Inline emitter tubing is sturdier and easier to reuse. Avoid soaker hose for rows because it waters unevenly on slopes.
What is the difference between drip tape and inline emitter tubing?
Drip tape is a flat, thin walled tube with prepunched holes. It lies flat and is meant for one or two seasons. Inline emitter tubing is round and thicker, with small drippers molded inside at fixed spacing. It handles curves better, lasts longer, and costs more. Both water rows well, but inline tubing is easier to repair.
Should I buy a drip kit with a timer?
Buy a timer if you travel, live in a dry climate, or tend to forget watering. A hose end timer runs on batteries and attaches between the spigot and the pressure regulator. Some kits include a timer, but many do not. A timer also lets you water early in the morning, which reduces evaporation.
How do I keep drip emitters from clogging?
Use a filter on the water source, flush the lines before capping the ends, and keep the tubing on the surface under mulch rather than buried. Hard water causes mineral buildup, so soak emitters in vinegar once a season if flow drops. A spare pack of emitters is cheap insurance.
Which Drip Kit Fits Your Garden
For a balcony or small backyard with pots and a few raised beds, pick a kit with punch in emitters, a pressure regulator, and 1/4 inch microtubing. It handles irregular spacing and runs from a bucket or a hose. If you grow straight rows of vegetables, switch to a drip tape or inline emitter kit with 6 inch spacing. That row focused kit waters more evenly for less money, but it will frustrate you on a balcony full of mixed pots.
Real drip irrigation kit listings, so you can check the points in this guide against actual products. These are affiliate links: as an Amazon Associate we earn from qualifying purchases, at no extra cost to you.
 TJJFMM TJJFMM 230FT Drip Irrigation System for Garden with 40 Nozzles…
View on Amazon ↗
 RAIN BIRD Rain Bird POTTEDKIT Drip Irrigation Kit, Full Circle, 1/4"
View on Amazon ↗
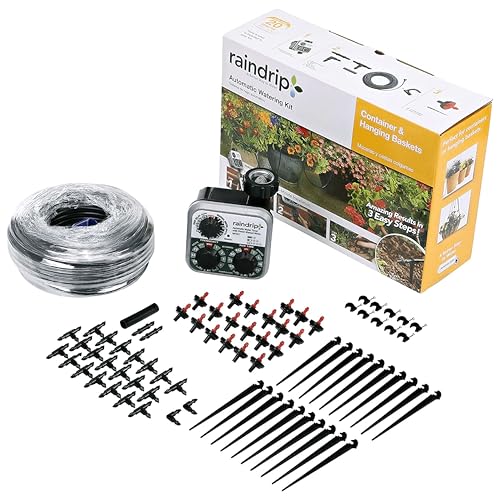 RAINDRIP Raindrip R560DP Drip Watering System, Automatic Drip Irrigation System with…
View on Amazon ↗
Listing names and images come from Amazon and are rechecked against the live listings; last checked Nov 8, 2026. No prices shown; the current price is on the listing.
How to read this guide. This guide covers drip irrigation kits as a product type, not any specific model. It is written from general knowledge of how these systems work, so check the listing for your kit's pressure range, emitter flow rate, and included parts before buying.